Search

Dark theme | Light theme

June 27, 2008

Change settings file for Maven

Maven uses the settings.xml file from ${user.home}/.m2. I was working on a project lately and I wanted to have a different local repository, but didn't want to change it in ${user.home}/.m2/settings.xml, because it would interfere with my other projects. So I copied the settings.xml from ${user.home]/.m2 and changed the location of the local repository.

But how do we get this settings active when we run Maven? We can use the system property org.apache.maven.user-settings and point it to our new file. So we can run maven like mvn install -Dorg.apache.maven.user-settings=/users/dev/new_settings.xml and the new local repository is used.

To make sure we don't have to type it in every time we can use the environment variable MAVEN_OPTS. Everything we assign to this variable will be added to the mvn command line. So for Windows we do set MAVEN_OPTS=-Dorg.apache.maven.user-settings and now we can run mvn install and still the new local repository will be used.

Open system properties in Windows with Win+Pause

A quick shortcut to open system properties in Windows is Win+Pause. This can be useful to go quickly to the environment variables and change them.

June 24, 2008

Maximize window in NetBeans

Maximizing the current window can be done using the keys Shift+Esc. But we can also double click with the mouse on the tab of the window. This will also maximize (or minimize when already maximized) the window.

June 23, 2008

Quick access to versioning commands in NetBeans

Right-clicking in the editor of the source file will not show the commands for versioning. We can first select the action Select in | Projects and then right-click on the file node in the projects navigator. But that is too much clicking and selecting. We can by-pass these steps and right-click on the tab of our source file. And we get the versioning commands right there:

Enable whitespace for diff in NetBeans

I was working on a project and changed some files. NetBeans showed me several files had been modified compared to the latest versions from the versioning control system. But when I wanted to see the differences using the diff viewer in NetBeans I saw no changes. I turned out the only change had been in whitespace and by default NetBeans doesn't show the whitespace differences. The following figure doesn't show any change, but the change is there:

We can disable this so we can see all the changes to a file, even whitespace differences. We need to go to Tools | Options | Miscellaneous | DIff. Now we can uncheck the checkbox Ignore Whitespaces:

The diff viewer will now show the extra spaces added to line 12:

June 20, 2008

Tooltip information for versioning labels in NetBeans

In a previous post we saw how to change the versioning labels. We can even do this quicker by using the information in a tooltip. If we hover our mouse over the input field (for Mercurial and Subversion versioning) we get a tooltip with an explanation of the different labels we can use.

June 18, 2008

Shortcut for quick code insertion in NetBeans

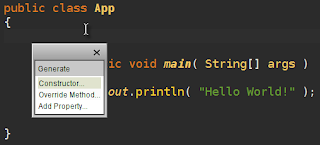
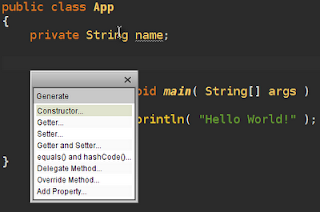
Creating a getter or setter method, overriding a method of a superclass, it is all stuff we do quite frequently when developing Java code. In NetBeans we have a shortcut to do this: Alt+Insert, or right-click in the source code and select Insert code...:

The options we have is dependent on the content of the Java source file. For example if we don't have any properties in our Java class, like in the previous screenshot, then we don't have an option to create a getter or setter. But if we do have a property, the option to create a getter or setter is there. The following screenshot shows we have more options, because of the property name in the source code:

Groovy and Grails will be standard in NetBeans 6.5

It seems the NetBeans 6.5 version will have some great standard functionality. Groovy/Grails support will be standard in the NetBeans edition.

June 17, 2008

Create new Tomcat instance in NetBeans

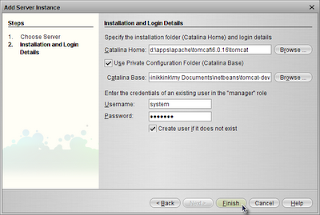
Generally it is a good idea to create a new Tomcat instance for development. This way the development and deployment is isolated from other applications. The directory of the instance is referred to by the CATALINA_BASE variable in Tomcat. When we configure a Tomcat server in NetBeans we can automatically generate the instance directory structure.

First we go to Tools | Servers and press the Add server... button. For this example we create a new Tomcat 6 instance, so we select Tomcat 6 from the list. Here we can change the name to reflect the purpose of the instance. We change the name to Tomcat 6 Sample. In the following dialog window we must fill in some values. The important one for us now is the checkbox Use Private Configuration Folder (Catalina Base). If we check this we can enter the name of the directory for our new instance.

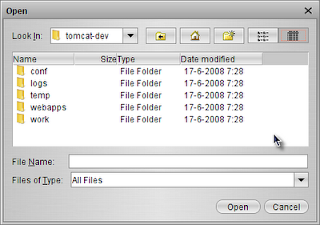
Keep in mind the directory must already exist, NetBeans will create the correct content in the directory, but not the directory itself. After filling in all necessary values we can press Finish, and NetBeans creates all the files and directories for our instance. The following screenshot show the content of the new instance directory:

June 13, 2008

Show Start Page in NetBeans

When we startup NetBeans for the first time, we get a Start Page with information about NetBeans. At the bottom of the page is a checkbox Show On Startup. Now we can choose if we want this page to be shown every time we startup NetBeans. If we choose to not show the page on startup, we can still show the page when NetBeans is running. Therefore we go to Help | Start Page and we get the start page back.

Change URL to show when running webapp in Maven

For a Maven based web application project in NetBeans we can assign a server to be used. This server is for example Tomcat. When we execute the Run action on the project, Tomcat will be started and the web application's start page (usually /index.jsp) will be shown in a web browser.

We can change the page that is shown in the web browser when the project is run. We right-click on the project node and select Properties | Run. We can fill the Relative URL field with any URL we want for our web application.

Should I wait for the Flip?

We want to buy a nice little video camera, which is easy to use and operate. I have read about The Flip. This really looks easy to use and fun. Just a simple record button and go. But it is not available outside North America. And they will not deliver outside of North America. So should we wait for it to become available here in the Netherlands or look for a replacement?

Inspect what is happening with Process Explorer

Sysinternals have a bunch of nice tools to look at what is happening on our computers. The one I use most is the Process Explorer. The Process Explorer is basically the Windows Taskmanager on steroids. We get a lot more information about the different processes, the CPU usage, the command line that started the process and more. So every time my computer gets slower I start Process Explorer to see which process is responsible and kill it immediately.

June 11, 2008

See what is executed for Maven project actions

In NetBeans a Maven based project integrates seamlessly with the IDE. The actions for a project, like Build project and Test project, invoke Maven goals. To see which goals are used we can right-click on a project and selected Properties. Then we select Actions and we can see which Maven goals are executed for the different actions.

Besides seeing the goals we can add our own goals to be executed for a action!

June 9, 2008

Weekly Sightings

960 Grid Systems
Useful idea for fast prototyping of HTML pages with a grid layout. Because of the consistent way the grid columns are setup the resulting layout will be clear and consistent. I don't like the restriction of a maximum width of 960 pixels, but for prototyping it can be good. The download also contains templates files for example Photoshop and a PDF with pages we can use for sketching.

Apple
The search box of Apple's site looks really nice. When we type in characters we can immediately see search results with images and explanatory text.

A little voodoo magic in NetBeans: hot deployment web application

When I am working on a web application I normally start Tomcat with mvn tomcat:run, change my source file (for example a JSP file), run mvn war:exploded to get the changed file in Tomcat and refresh my page in my web browser. And then I get to see my changed JSP.

Today I was working on a Maven based web project in NetBeans. I changed something in my JSP file, but I forgot to run mvn war:exploded before I refreshed the web page in my web browser. But to my surprise the change was already there on my screen. NetBeans had already copied my changes so Tomcat could picked it up. Wow! This really speeds up my development by factors. (my next step is to configure Tomcat in NetBeans...)

Project site in Maven project structure in NetBeans

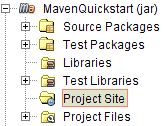
If we add a site directory to the src directory of a Maven project in NetBeans, we get an extra node in the structure: Project site. Here we can put all our files for the project's site. We can run mvn site to build the site.

NetBeans shows project structure for Maven projects

NetBeans has great support for Maven. For example the project structure in the Project navigator of NetBeans reflects the type of Maven project. A simple project has separate folders for sources, resources, libraries and project files. A web application project has an extra folder for web pages. This makes it very easy to navigate to our source files in the different projects.

Quick access to services control panel in Windows

To quickly open the services control panel in Windows we must type services.msc on the command prompt. Or we can press Windows key + R to open the Run window and type services.msc.

June 6, 2008

Set global Maven command line options

We can set global command line options for Maven in Windows by creating a file called mavenrc_pre.bat in our %USERPROFILE% directory. This batch file will be executed by the mvn.bat command. So for example we can add set MAVEN_OPTS=-Xmx256M to the file and this will be added to the command line automatically each time we invoke mvn.bat.

Dark color schemes in NetBeans

Update: this post is for NetBeans 6.1 up to 6.7 This method doesn't work for later NetBeans versions.

I like to personalize my computer and applications. I played around with different color schemes in NetBeans, but I wasn't too happy about the results. But now I have seen two very nice dark color schemes. The first one is Ruby Dark Pastels. The Dark Pastels theme was designed by Jerrett Taylor. We get the scheme if we install the Extra Color Ruby Themes plugin from Tools | Plugins. Now we can go to Tools | Options | Fonts & Colors and select the new color scheme. The following screenshot show the result for a Java source file:

Another very nice theme (and my favorite for now) is the Aloha color theme. We can download the theme as plugin and manually install it in NetBeans using Tools | Plugins | Downloaded. The next screenshot shows the theme for a Java file:

Fast bookmarking in NetBeans

It is very easy to add a bookmark to a file in NetBeans. We simply press Ctrl+Shift+M and in the gutter we see the bookmark icon (a blue arrow):

We can navigate between bookmarks with the following key combinations:

  • next bookmark via Ctrl+Shift+.
  • and previous bookmark via Ctrl+Shift+,

Besides using the keyboard we can use the buttons on the editor toolbar:

June 3, 2008

Display hidden dot files and directories in NetBeans

By default we cannot see directories or files which start with a dot (.). These files and directories are considered hidden. We can change NetBeans so these files and directories are shown. We go to Tools | Options and press the Advanced Options button. A new dialog window is opened. We need to select Options | IDE Configuration | System | System Settings. The property Ignored Files contains a regular expression which states which files and directories are not shown in NetBeans. The default setting is: ^(CVS|SCCS|vssver.?\.scc|#.*#|%.*%|\.(cvsignore|svn|DS_Store)|_svn)$|~$|^\..*$. The last entry defines the files and directories which start with a dot. We remove ^\..*$ and now we can see the hidden files and directories.

Change versioning label format in NetBeans

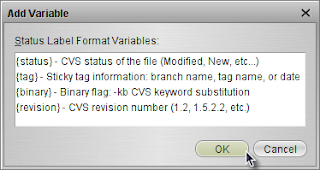
We can change the information we see for files with versioning information. Normally we would see if a file is modified or new and in which branch a file belongs. But we can display more information. For example for files under control of CVS we can add the revision number. To change the label we go to Tools | Options | Miscellaneous. We select the Versioning tab. On the left we can select the versioning system we use. And then we have on the right a field called Status Label Format. We press the button Add Variable.. to change the label contents:

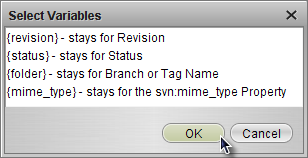
For Subversion we have different options:

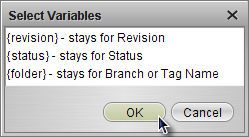
And for Mercurial we can use the following settings:

Putty for telnet and SSH access to computers

I use Putty to access other computers through telnet or SSH. Putty is very configurable and support the protocols well. The option to save sessions with their settings is very useful, because connecting to a computer is now a simple mouse click.

June 2, 2008

Editor font for programming

After reading Monospace/Fixed Width Programmer's Fonts I decided to switch my editor font to Bitstream Vera Sans Mono. As a bonus I increased to default font size so I can read my application code better. A bigger font size also forces me to not write long methods, because I cannot see them otherwise on one screen.

The before picture in NetBeans:

And the after picture in NetBeans:

Change the font in the output window in NetBeans

On my Windows system the output window in NetBeans shows all text in Courier New font. This is the so called monospace font of the JDK running NetBeans:

We can change this monospace font so the text in the output window will be shown with the changed font. We must go to the JDK directory which is used to start NetBeans. In the jre/lib directory is a file with the name fontconfig.properties.src. We make a copy of this file and name it fontconfig.properties. We can open the new fontconfig.properties file in a text editor and look for the line with the text monospace.plain.alphabetic. We can change Courier New to another font name, for example Monaco. The following screenshot shows the Monaco font in NetBeans:

A side effect is that all monospace fonts in all Java applications started with the JDK have the same changed font...

Make lines wrap in output windows of NetBeans

The output window of NetBeans can contain very long lines of text. Normally we get a horizontal scrollbar and we need to scroll to see the complete line. But we can also wrap the text, so we don't have to scroll anymore. In the output window we must press Ctrl+R to enable the text wrapping. Or we can right-click in the output window and select Wrap text. A nice feature is the addition of little arrows at the end of the lines that are wrapped. See the following screenshot for an example:

Smaller toolbar icons in NetBeans

The toolbar icons in NetBeans can be shown in a smaller size. We have to go to View | Toolbars and then select Small Toolbar Icons. To get the bigger icons back we simply deselect Small Toolbar Icons.